01
Click on Properties List
The user clicks the Properties List link in the left-hand menu to display the main inventory of all managed properties.
Follow the steps below to complete this action inside Marafiqy.
The user clicks the Properties List link in the left-hand menu to display the main inventory of all managed properties.
The user can view the key summary data for each property, including the Property Name, Region (e.g., Jeddah), Type (e.g., Residential), number of Units, pending Requests, and the total estimated Rent.
The user can use the Search bar or the dropdown menus to Filter the list by City, Property Type, or Unit Type to locate specific assets.
The user clicks the blue Advanced Filter button to open additional search criteria for more specific property lookups.
The user clicks the Download Report button to export the entire property list, or the results of the currently filtered view, into an external file.
The user clicks the eye icon in the Action column to navigate to the detailed profile page of the specific property.
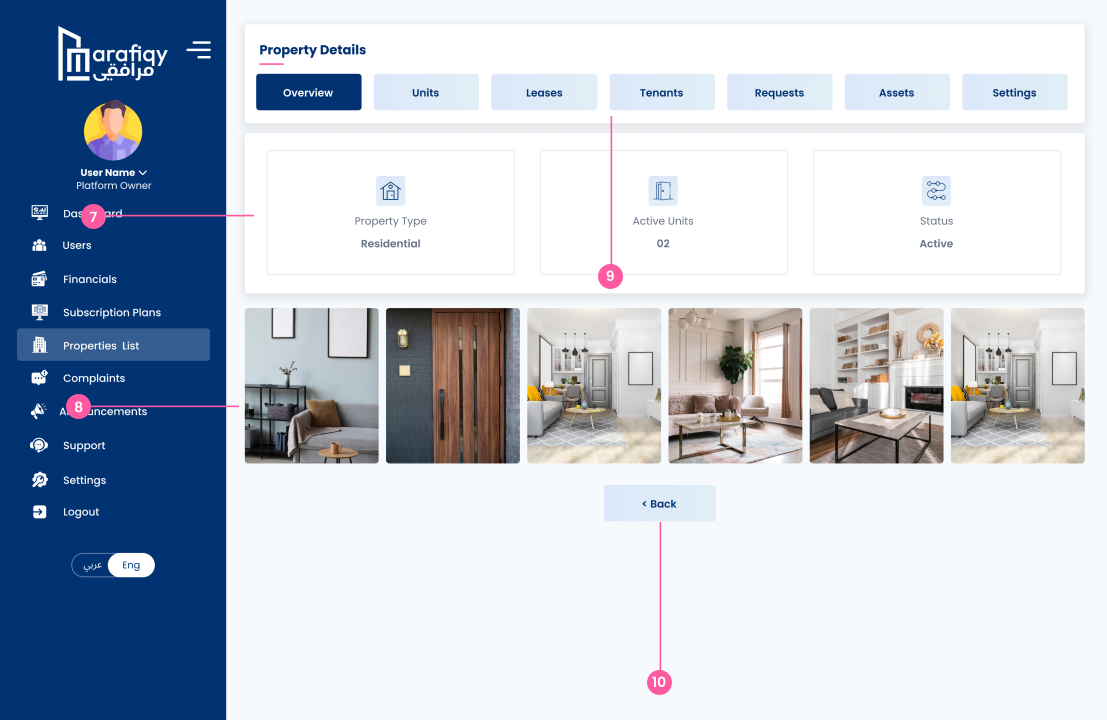
They see the core details: the Property Type (“Residential”), the count of Active Units (02), and the property’s overall Status (“Active”).
The owner sees the gallery of property images and can perform the action of clicking them to inspect the visuals of the asset.
They can perform the action of clicking the tabs for Units, Leases, Requests, Assets, and Settings to access detailed records.
They can perform the action of clicking the “< Back” button to immediately return to the main Properties List screen.
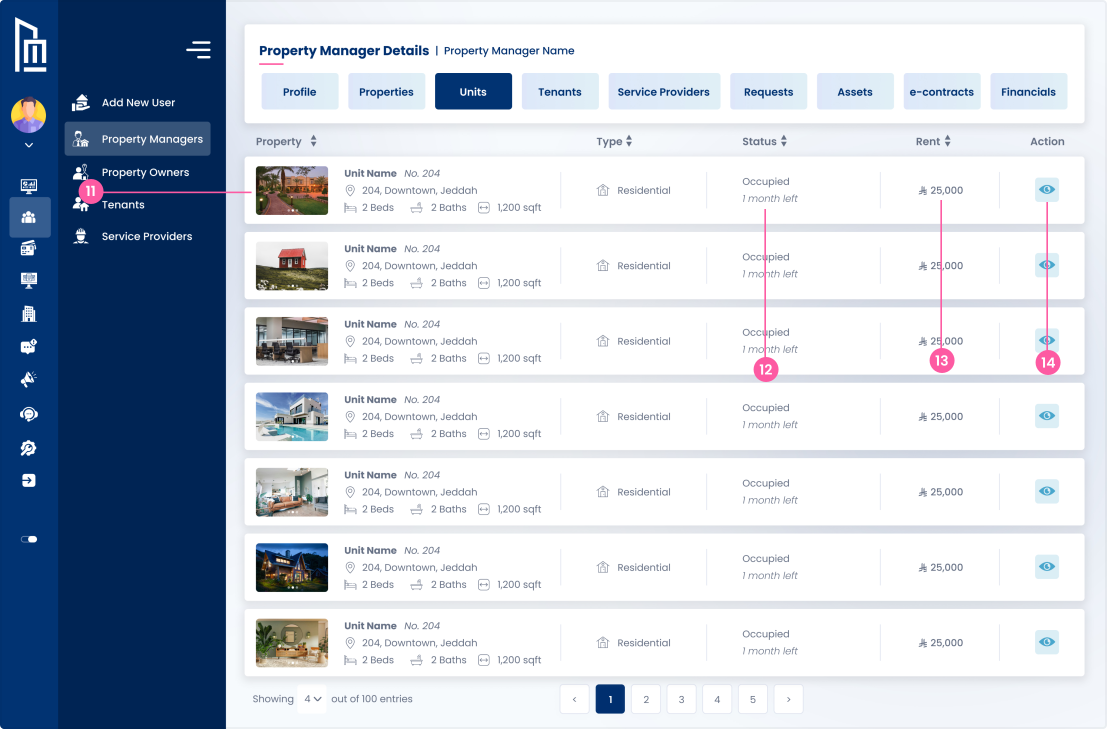
The user can view the unit’s specifics, including the Unit Name, Unit No., number of Beds and Baths, and the Size (e.g., 1200 sqft).
The user reviews the current availability and tenant status of the unit (e.g., Occupied 1 month left, Vacant from 2 months, Lease in Progress).
The user can view the expected Rent amount and the current outstanding Balance for that unit.
The user can filter the list by clicking on the column headers for Property Type, Status, Rent, or Balance to organize the view.
The user clicks the eye icon in the Action column to navigate to the detailed profile page for that specific unit.
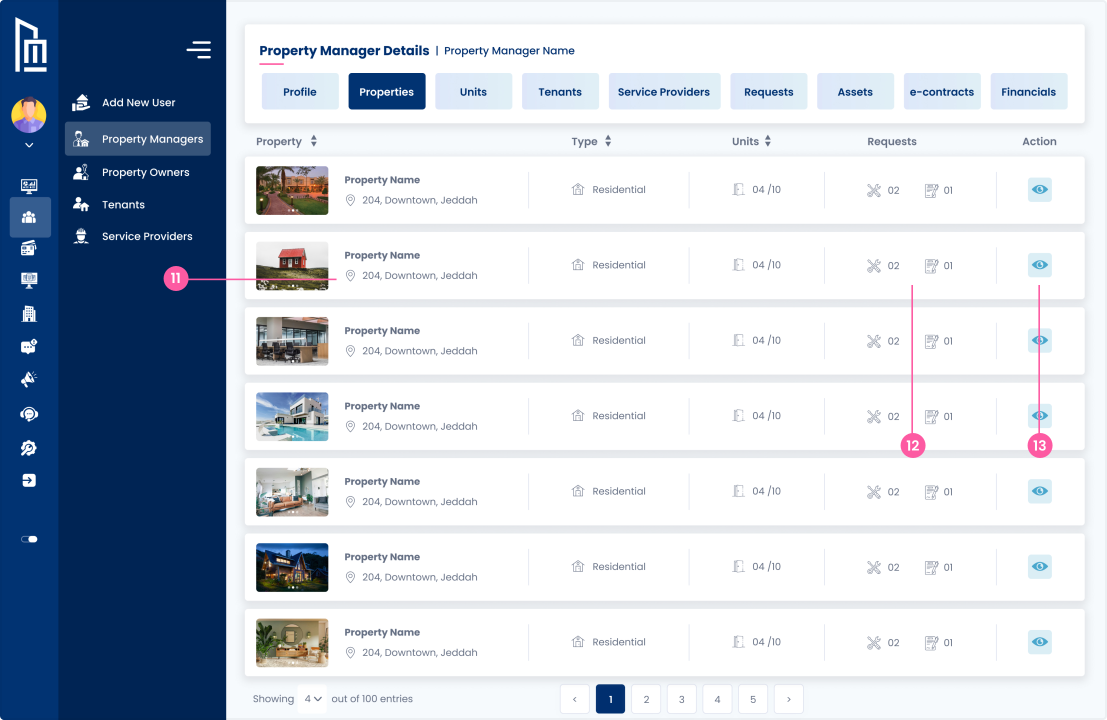
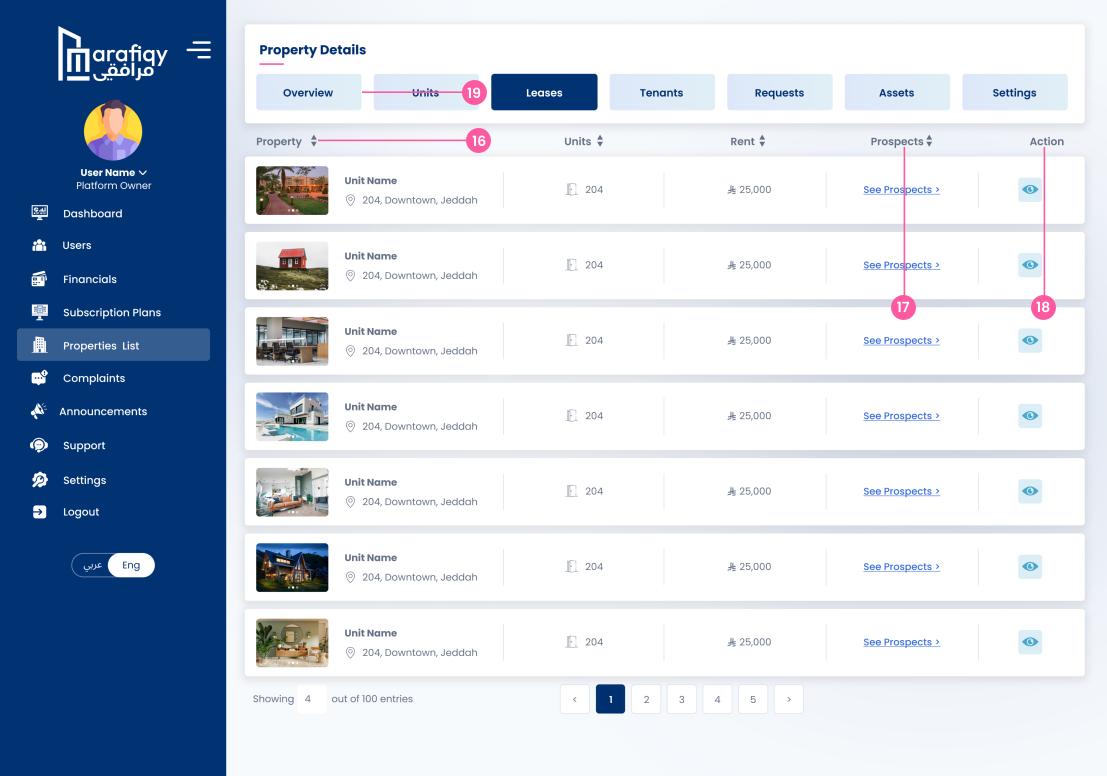
They see a list of units, showing the Unit Name, Address, number of Units, and the current Rent amount for each.
They can perform the action of clicking "See Prospects" to access the list of potential tenants or applications currently interested in that specific unit/lease.
They can perform the action of clicking the Eye Icon in the Action column to open the detailed lease document and history for the unit.
They can perform the action of switching back to the "Overview," "Units," "Tenants," "Requests," "Assets," or "Settings" tabs for other management tasks.
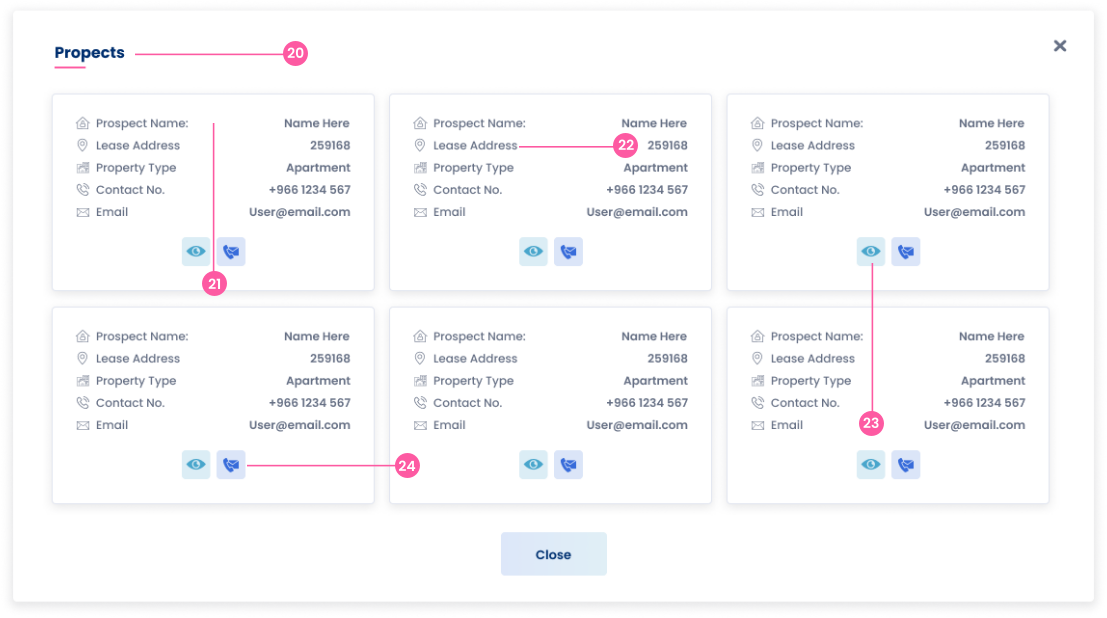
The owner sees a list of individual applicants, each with a tile showing their core details and the property they applied for.
They see the Prospect Name, Contact No., and Email for each applicant to initiate communication.
They see the specific Lease Address and Property Type (Apartment) the prospect is interested in renting.
They can perform the action of clicking the Eye Icon on any tile to open and view the applicant’s full submitted details or background check reports.
They can perform the action of clicking the blue icon (likely a message or contact button) to take an immediate step regarding the prospect’s application.
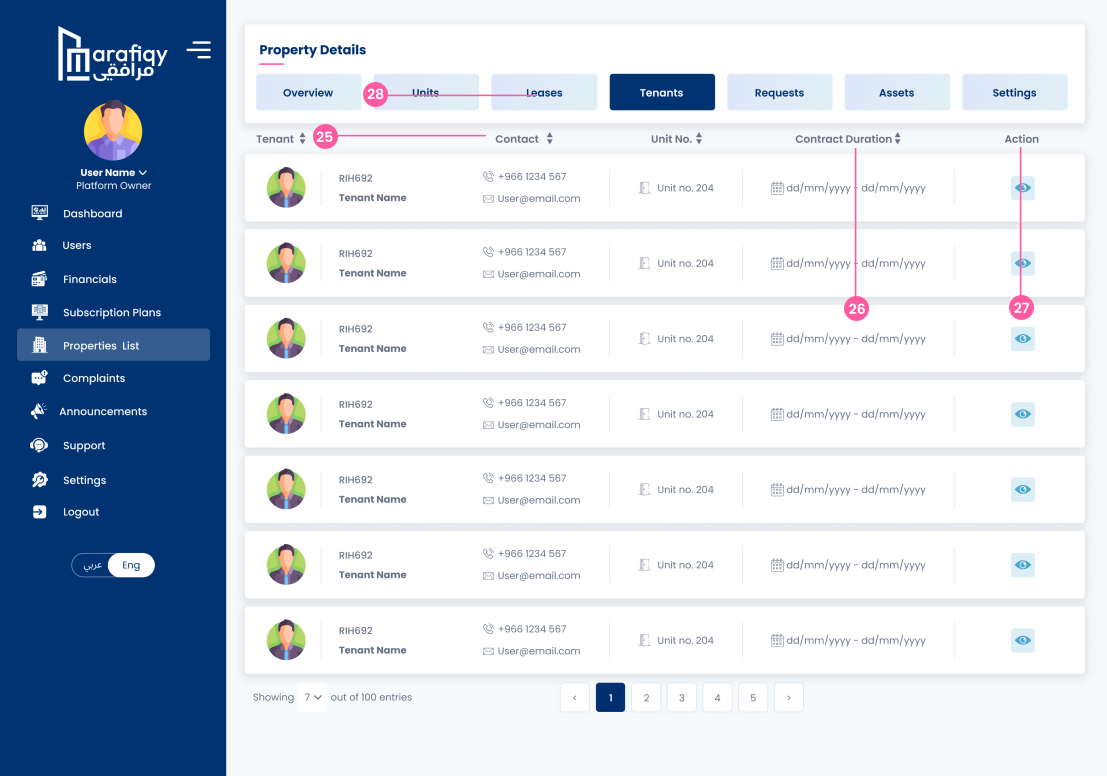
They see the Tenant Name, full Contact information (phone/email), the assigned Unit No. (e.g., Unit no. 204), and the Contract Duration.
They can see the specific start and end dates defining the Contract Duration for each tenant in that property.
They can perform the action of clicking the Eye Icon in the Action column to open the detailed Tenant Profile for that specific user.
They can click to switch to the Overview, Units, Leases, Requests, Assets, and Settings tabs for other management functions related to this property.
They see a list of acquisition requests, including Unit Details (Name, Address, Beds/Baths, sq. ft), Tenant Info, Type (Residential), and the Rent amount.
They can perform the action of switching between viewing "Acquisition Requests" and "Service Requests" using the two sub-tabs at the top.
They can perform the action of clicking the Eye Icon in the Action column to open the detailed log and information for that specific request.
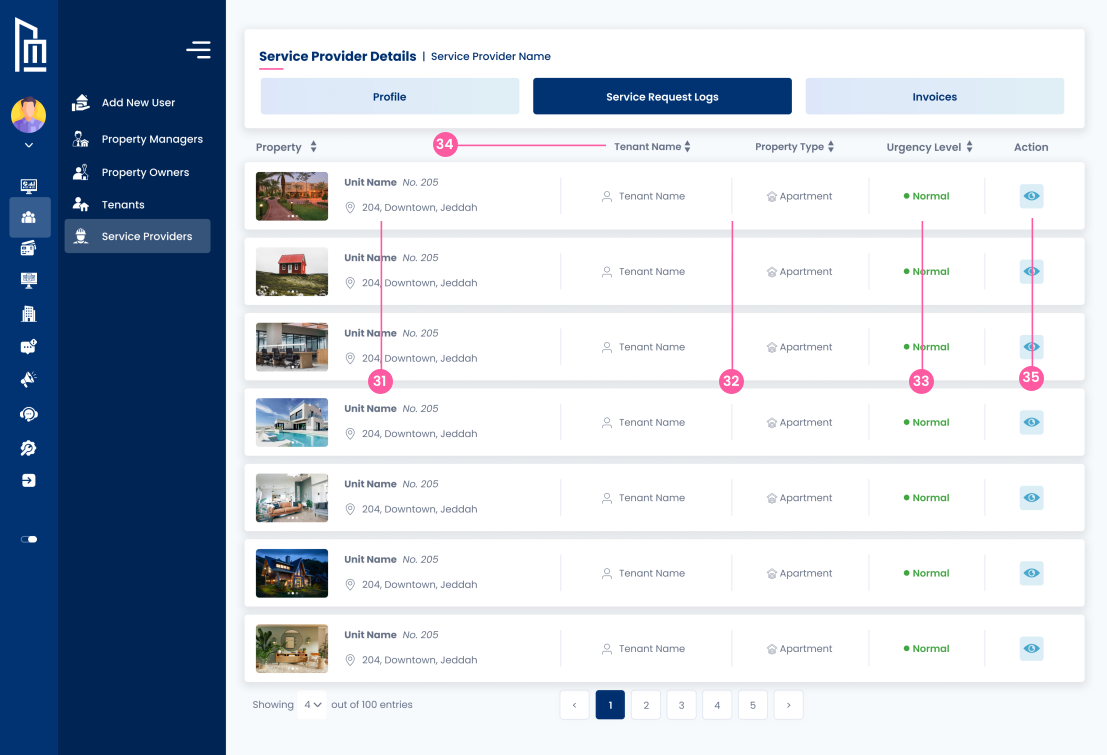
They can click to switch to the Overview, Units, Leases, Tenants, Assets, and Settings tabs for other property management functions.
The owner clicks the "Service Requests" sub-tab to view a list of all maintenance or service issues raised for the property.
They see the specific Service Type (e.g., Electrician), the initiating Tenant, the affected Unit Name and Unit No., and the Request Date.
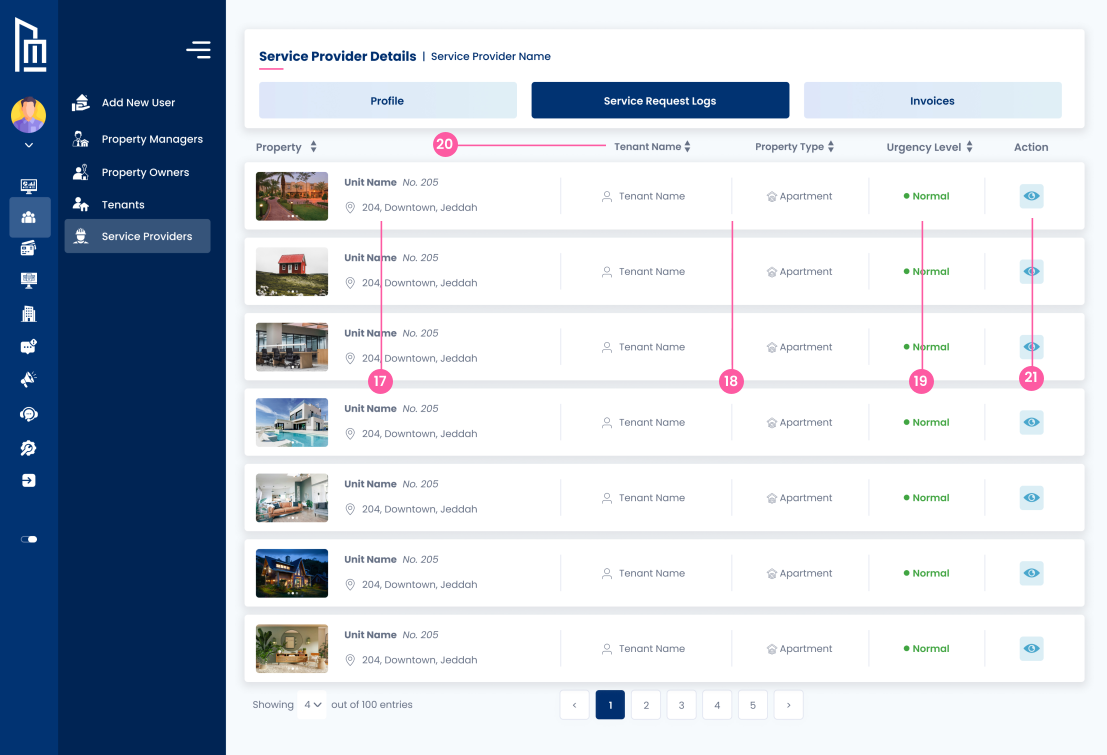
They can quickly see the Status of each service request, such as "Pending", to track active issues within the property.
They can perform the action of clicking the Eye Icon in the Action column to view the detailed history and communication log for that request.
They can click to switch to the Overview, Units, Leases, Tenants, Assets, and Settings tabs for other management functions related to this property.
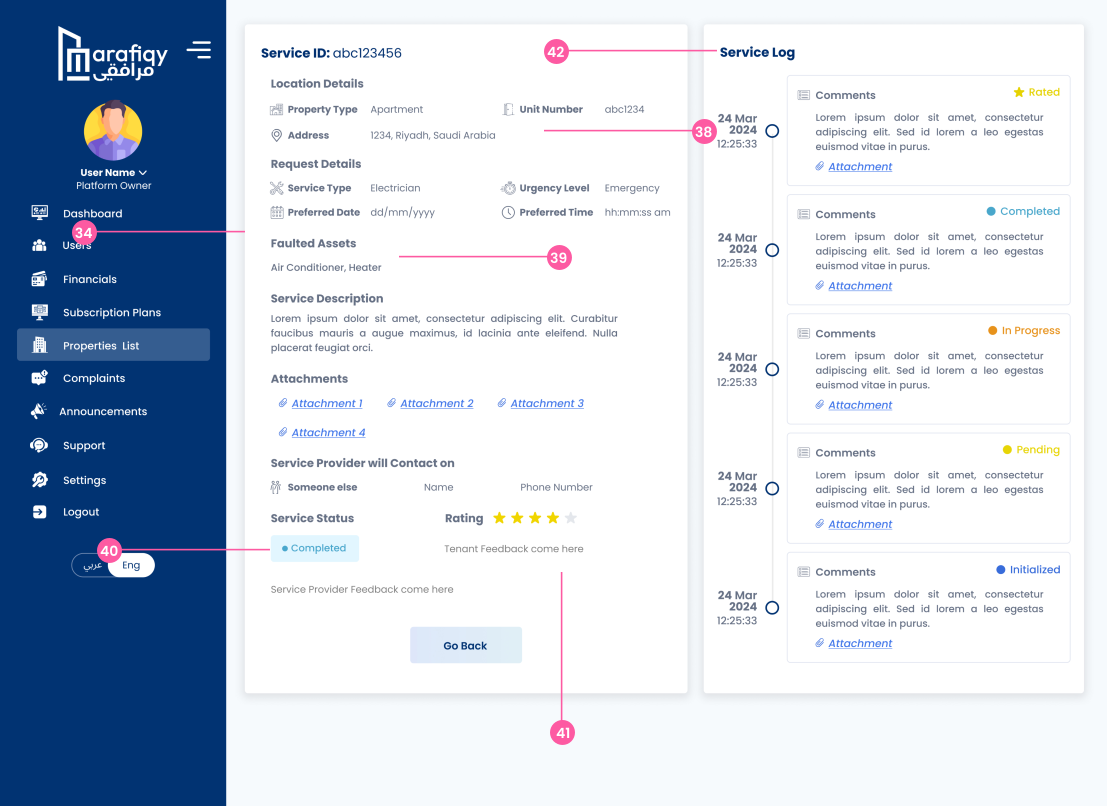
They see the unique Service ID, the property’s Address, Property Type, Unit Number, and the full Request Details including Service Type (e.g., Electrician) and Urgency Level (e.g., Emergency).
They see a list of the specific items that are reported as damaged, such as Air Conditioner or Heater.
They see the chronological Service Log, tracking the issue’s progression from “Initialized” to “Pending,” “In Progress,” and finally “Completed”.
They see the assigned Service Provider’s Name, Phone Number, Service Status (“Completed”), and the Rating left by the tenant.
They can perform the action of viewing or downloading multiple Attachments (photos, documents) and see comments logged at each step of the service process.
The user can view the specifics of the asset, including the Item Name (e.g., Electrical), its Category, and a short Item Type description.
The user reviews which Unit Name and Unit No. the asset belongs to, which Service Provider Name was last requested by, and who issued by the asset (e.g., Property Manager Name).
The user can filter the list by clicking on the column headers for Item Details, Unit Name, Unit No., Requested by, or Issued by to organize the inventory.
The user clicks the eye icon in the Action column to navigate to the detailed profile page for that specific asset.
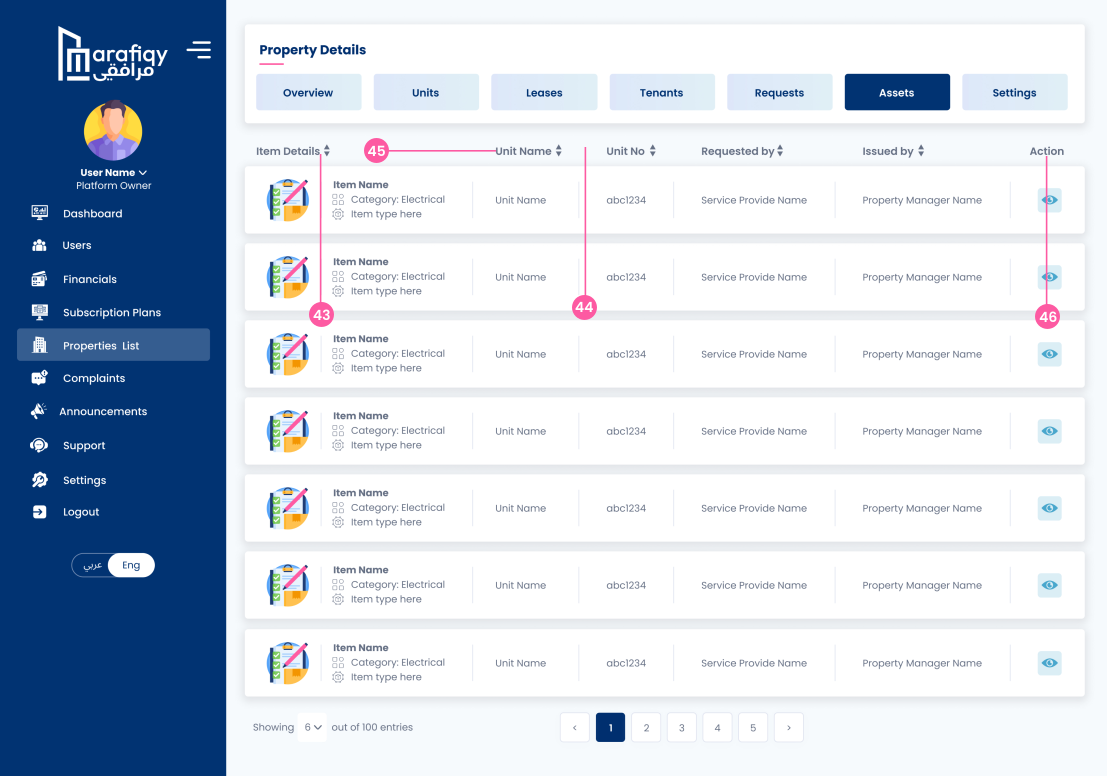
The user can view the specifics of the asset, including the Item Name (e.g., Electrical), its Category, Item ID (e.g., abc1234), and the short Item Type description.
The user reviews which Unit No. the asset belongs to and the full Item Details column for its QR code and category information.
The user can filter the list by clicking on the column headers for Item Details, Item ID, Item Type, or Unit No. to organize the inventory.
The user clicks the eye icon in the Action column to navigate to the detailed profile page for that specific asset.
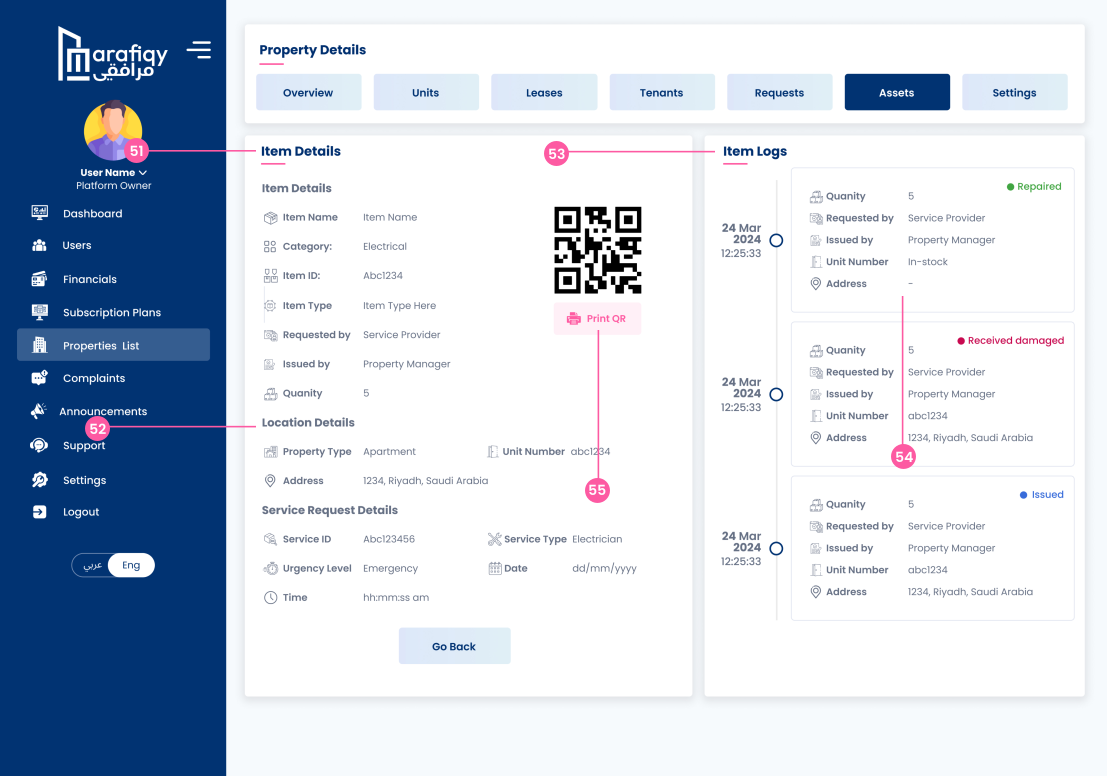
The owner sees the asset’s Item Name (e.g., Electrical), Category, unique Item ID, and Quantity (e.g., 5).
They see the location details, including the Property Type, Unit Number, and the specific physical Address where the asset is located.
They see the chronological Item Logs, detailing when the asset was Issued by the Property Manager, Requested by a Service Provider, and its status updates (e.g., “Repaired” or “Received damaged”).
They see the related Service Request Details, including the Service ID, Urgency Level (e.g., Emergency), and the Service Type (e.g., Electrician) that affected the asset.
They can perform the action of clicking “Print QR” (next to the QR code image) to generate a physical tag for inventory tracking of the asset.
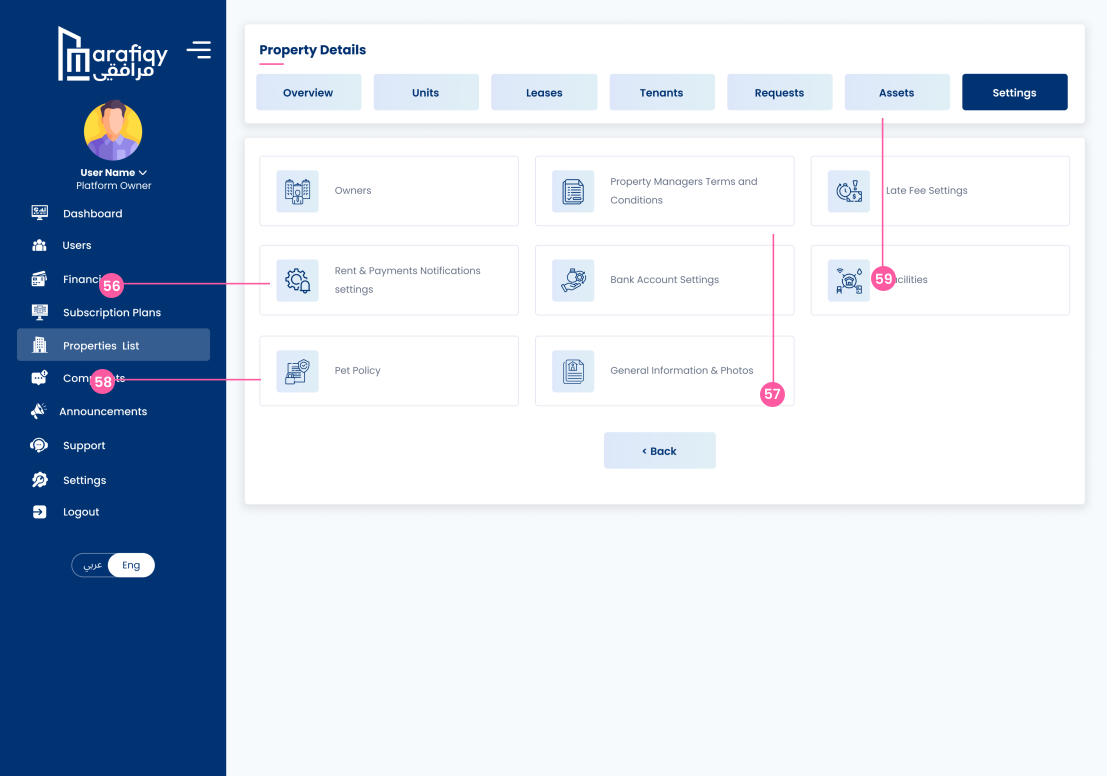
They see and can modify the settings for Rent & Payments Notifications and Late Fee Settings to control financial interactions.
They see and can configure the rules for Owners, Property Managers Terms and Conditions, and Bank Account Settings.
They see and can manage the property’s Pet Policy, available Facilities, and upload General Information & Photos for the asset.
They can click to switch to the Overview, Units, Leases, Tenants, Requests, and Assets tabs to view other management areas.
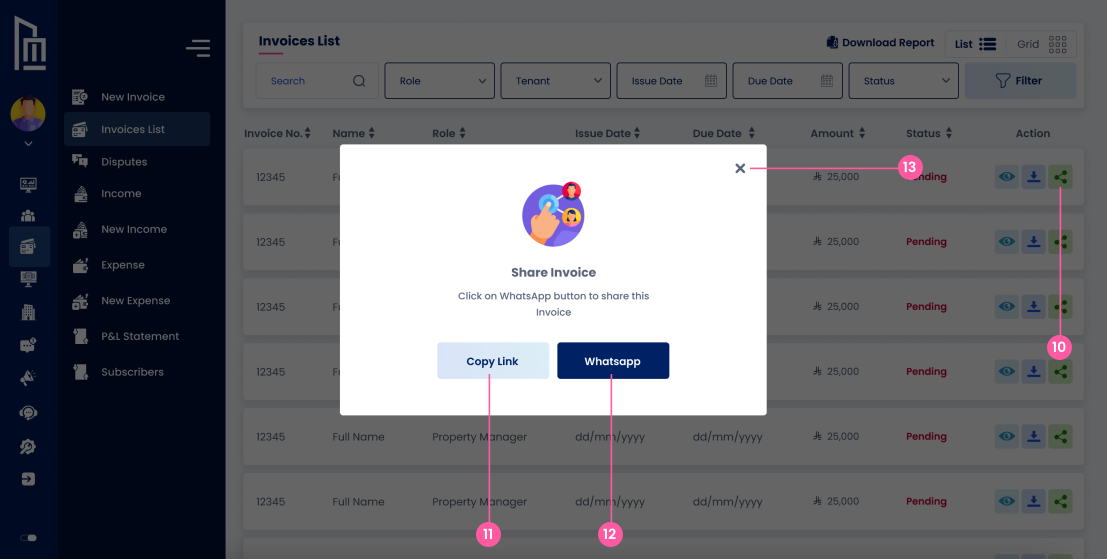
The user sees a list of all current property owners displayed in separate cards (e.g., Property Owner 1, Property Owner 2), indicating who is linked to the asset.
The user clicks the blue ‘+Add Owner’ button to open a selection or search screen and link a new user profile as an owner of the property.
The user clicks the ‘X’ icon on any owner’s card to remove that user from the list of owners associated with the property.
Once the changes are complete, the user clicks the ‘X’ button in the top right of the pop-up to close the owners management tool.
They can perform the action of updating the rules and stipulations by typing/editing text in the large description box.
They perform the final action of clicking the "Update" button to save the revised terms and conditions to the system.
They can perform the action of closing the pop-up and returning to the "Settings" screen by clicking the ‘X’ button.
They see and can input the expected Rent Amount and Due Date (with a calendar picker) used as the basis for calculating late fees.
They see and can select the payment frequency (Per Month is visible) and input the specific amount or percentage for the Late Fee Penalty.
They perform the final action of clicking the "Update" button to save the new financial rules, enforcing the late fee policy across the property.
They can perform the action of closing the pop-up and returning to the "Settings" screen by clicking the ‘X’ button.
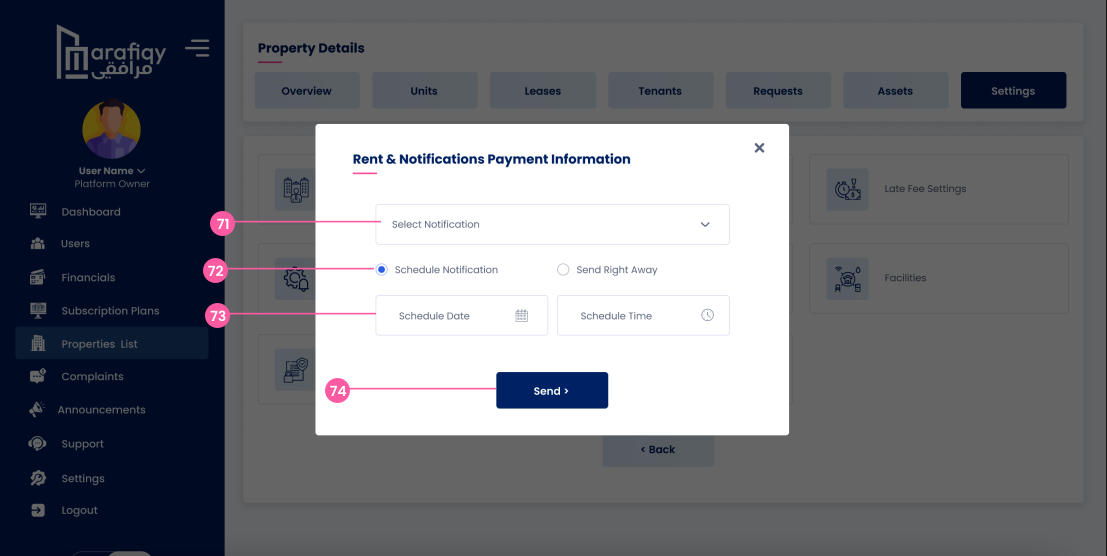
The user clicks the dropdown menu to select the specific Notification they want to schedule or send (e.g., Rent Due, Late Fee Reminder, etc.).
The user selects either the ‘Schedule Notification’ radio button for a planned future delivery or ‘Send Right Away’ to dispatch the notification instantly.
If ‘Schedule Notification’ is chosen, the user inputs the desired future Schedule Date and Schedule Time using the calendar and time pickers.
The user clicks the blue ‘Send’ button to process the action, either scheduling the notification or sending it immediately based on the selected options.
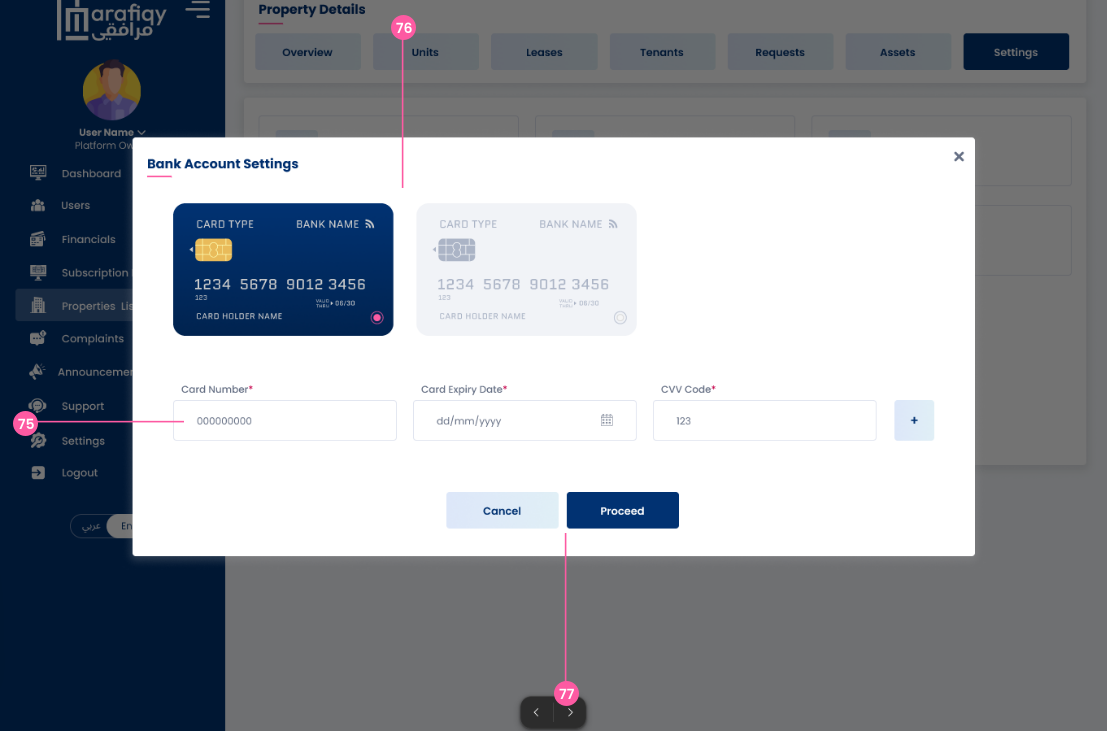
They perform the action of inputting the Card Number, CVV Code, and Card Expiry Date into the required fields for the primary payment method.
The owner sees two distinct card representations and can perform the action of selecting a pre-existing card or inputting the details for a new card (Number, Expiry, CVV) in the fields below.
They perform the action of clicking the "Proceed" button to submit the new banking information, or "Cancel" to discard the entry.
The user checks the boxes next to all available amenities, such as Alarm, Tiled Floors, Furnished, Fire Place, Dishwasher, and Carpet.
If an amenity is not listed, the user clicks the ‘+ Add More’ link to input and save a custom facility for the property.
After making all selections and changes, the user clicks the blue ‘Update’ button to save the current list of facilities to the property profile.
The user can click the ‘X’ button in the top right of the pop-up to close the facilities management tool without applying any unsaved changes.
They can perform the action of updating the rules by typing/editing text in the large description box to define the official Pet Policy for the property.
They perform the final action of clicking the "Update" button to save and enforce the new pet policy for the property.
They can perform the action of closing the pop-up and returning to the "Settings" screen by clicking the ‘X’ button.
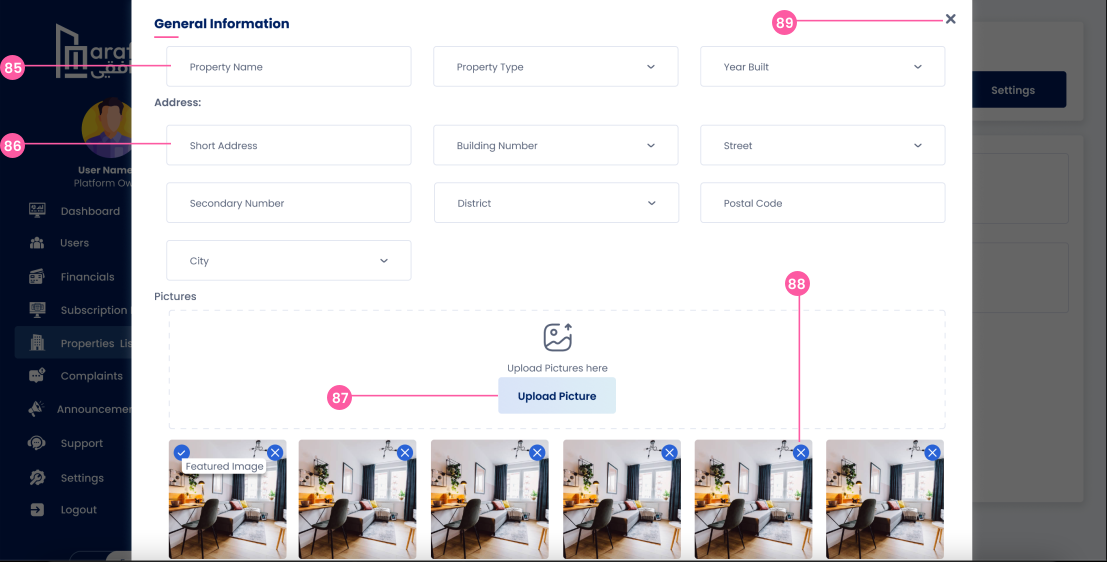
The user fills in the fields for the Property Name, selects the Property Type (using the dropdown), and selects the Year Built.
The user inputs the complete location details, including Short Address, Building Number, Street, Secondary Number, District, Postal Code, and City.
The user clicks the ‘Upload Picture’ button to select images from their device, which are then displayed in the gallery below.
The user can view the uploaded pictures and click the ‘X’ icon on any image to remove it from the gallery.
Once all details and pictures are added, the user clicks the ‘X’ button in the top right or the ‘Settings’ button in the background to exit and save the information (assuming a ‘Save’ or ‘Update’ button exists below the fold).