
01
Click on Calendar:
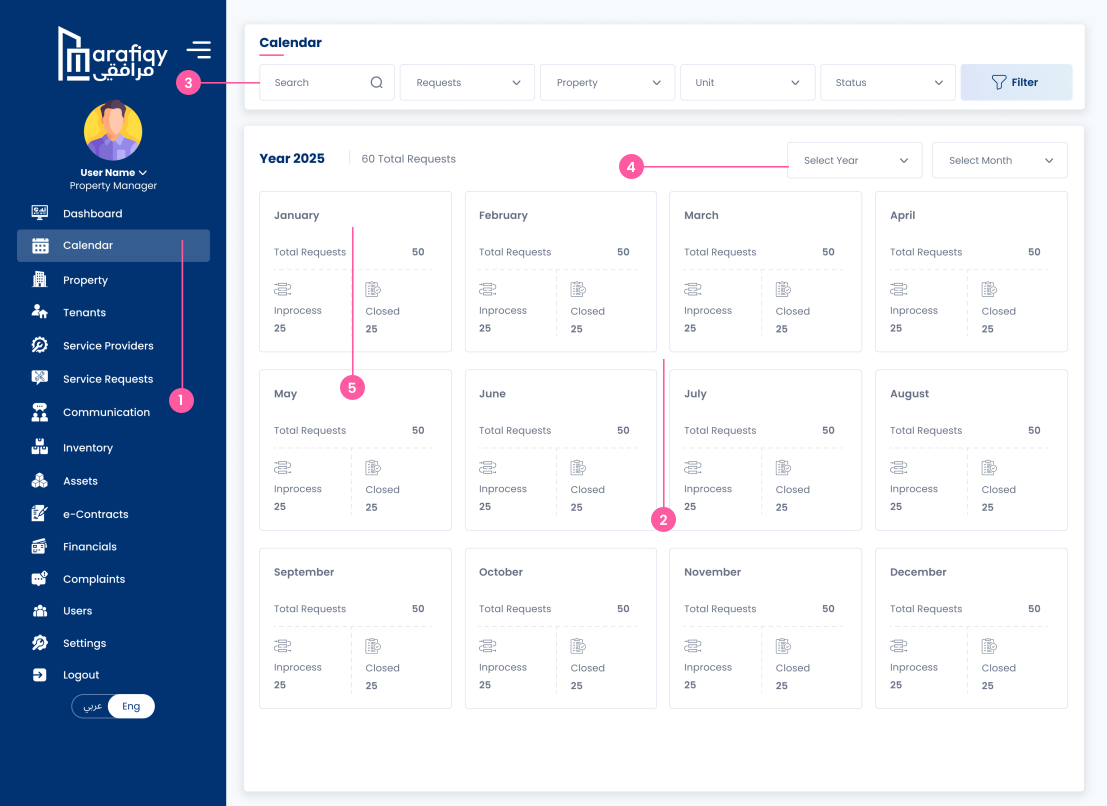
The user clicks the Calendar link in the left menu to view a monthly summary of service requests and associated tasks for the current year.
Follow the steps below to complete this action inside Marafiqy.
The user clicks the Calendar link in the left menu to view a monthly summary of service requests and associated tasks for the current year.
The user sees a card for each month, displaying the Total Requests (e.g., 50) and a breakdown into Inprocess (e.g., 25) and Closed (e.g., 25) statuses.
The user can use the Search bar or the dropdown menus to Filter the calendar by Requests, Property, Unit, or Status to narrow down the displayed data.
The user can select a specific Year or Month from the dropdown menus at the top right to change the period displayed on the screen.
By clicking on a specific months summary card (e.g., January), the user is likely able to drill down and view the daily or list view of the events and requests.
The user clicks on a specific month from the annual calendar view (or uses the month selector) to display the detailed day-by-day calendar for that month (e.g., Month 2025).
The user can view the days of the month and check for scheduled requests, which are displayed with the time (e.g., 12:00 AM), the service type (e.g., AC Service), and the current status (e.g., Initiated, Completed, Pending).
The user notices that different statuses are indicated visually and by text (e.g., Completed in green, Pending in yellow, Initiated in blue, In Progress in orange).
The user can click the left and right arrows next to "Month 2025" to navigate to the previous or next month, or use the Select Year and Select Month dropdowns for quick jumps.
The user can use the Search bar or the dropdown menus to Filter the displayed requests by Requests, Property, Unit, or Status to focus on specific tasks.
The user clicks the relevant icon or link (likely on a calendar day or a dashboard widget) to open this pop-up displaying a grid of service Requests.
The user views each request card to see its current Status—which can be In Progress, Initiated, Pending, or Completed—with different color coding for easy identification.
For each request, the user reviews the essential information, including the Unit Name, Unit Number (e.g., 402), Time (e.g., 12:15:00 AM), and the type of Service requested (e.g., Apartment).
For any request not marked as Completed, the user clicks the Assign Service Provider button to select and dispatch a worker for that task.
The user clicks the eye icon next to the assign button to open the detailed log and history of that specific request.
The user clicks the Assign Service Provider button (from the Requests pop-up or a similar screen) to open the list of available contractors.
The user examines the card for each provider, whether Individual (Service Provider Name) or Company (Company Name), viewing their ID (e.g., ABC123) and location (e.g., Saudi).
The user reviews the providers listed specializations (e.g., Carpenter, Painter, Electrician) to ensure they match the requested service.
The user checks the providers contact details (Phone, Email), Years of experience, and Locations Covered (e.g., Location A, Location B).
The user clicks the blue Assign Service Provider button on the card of the preferred contractor to dispatch them for the service request.